How to Use the GameSir T7 Pro Sugar Whirl
Soft Hues, Serious Performance, Wireless on XBOX
Product Overview
Key Features
- • Tri-Mode Connectivity: Bluetooth, 2.4G Wireless, and Wired
- • GameSir Mag-Res™ TMR sticks for smoother control
- • Hall Effect analog triggers, with 2-stage trigger stops
- • Fully software-customizable
Tech Specs
- • Working Platform:XBOX, PC, Android
- • Connection: Tri-mode for XBOX and PC; Bluetooth for Android
- • Weight: 272 g / 0.60 lbs
- • Supported Software: GameSir Nexus app
System Requirements
Windows PC
Windows 10/11 Bluetooth, Wireless Dongle, Wired
XBOX
XBOX One, XBOX Series X|S Wireless Dongle, Wired
Android
Android 8.0 or above Bluetooth
Getting Started
| XBOX Indicator | description |
|---|---|
| Breathing | Reconnecting State * It can connect to previously paired devices. |
| Flowing Light Mode(Surround FlowingEffect) | Paring State (Bluetooth Mode)*In this state, it can be discovered and paired with devices. |
| Solid | Connection Successful |
| Off | Power-off State * The controller will enter standby state after 10 minutes ofinactivity in 2.4G or Bluetooth mode. |
| Description | Operation |
|---|---|
| Power On/Off | Short press the XBOX button to power on. While powered on, press and hold the XBOX button for 5 seconds to power off. |
| Pairing | In Bluetooth mode, press and hold the pairing button for 2seconds to enter forced pairing mode. |
| Preset Configuration Switching | M+Y Configuration 1|M+B Configuration 2|M+A Configuration 3|M+X Configuration 4 |
| Hair Trigger Mode | Enable/disable hair trigger mode Press and hold the M button + LT/RT for 2 seconds |
| Light Effects Switch | Switch among 4 light effects. M + Left Stick's Left/Right. *The setup will still be saved after restart. |
| LED brightness | Increase/Decrease LED brightness. 5 levels, default is the brightest. M + Left Stick's Up/DownThe setup will not be saved after restart. |
| Trigger Mode Switch | Switch between long and short trigger pulls by toggling trigger gear switch. |
| Low Battery | When the battery is below 15%, the XBOX indicator will flash red. |
| Charging | You can charge the controller via the Type-C port or the charging station. |
Wired Connection
- Use the included Type-C cable to connect the controller to your computer, then press the XBOX button briefly to power on.
- Once connected successfully, the XBOX indicator will remain solid.
Receiver Connection
- Insert the receiver into the computer.
- Switch the controller to the 2.4G mode, and press the XBOX button briefly to power on. Wait for the controller to connect.
- Once connected successfully, the XBOX indicator will remain solid.
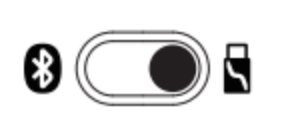
Bluetooth Connection
- Toggle the controller's mode switch to the Bluetooth mode,and press the XBOX button briefly to power on.
- Open the Bluetooth list on your phone, find the device named GameSir-T7 Pro, and click to connect.
- Once connected successfully, the XBOX indicator will remain solid.
- If the connection is unsuccessful, press and hold the paring button on the controller tore-enter pairing status.

WIRED CONNECTION 1.Use the included Type-C cable to connect the controller to the XBOX console, then press the XBOX button briefly to power on. 2.Once connected successfully, the XBOX indicator will remain solid.
- Only supports wired connection.
RECEIVER CONNECTION 1.Insert the receiver into the computer. 2.Toggle the controller's mode switch to the 2.4G mode, and press the XBOX button briefly to power on. Wait for the controller to connect. 3.Once connected successfully, the XBOX indicator will remain solid.
Sticks & Triggers
1.Set the trigger to analog mode, then press and hold View Button + Menu Button + M Button until the XBOX indicator starts flashing slowly.
2.Ensure that the LT & RT triggers and the left & right sticks are not being touched. Then Press the A button. The XBOX indicator will turn off.
3.Press the LT & RT triggers to their maximum travel for 3 times. Rotate the left & right sticks to their maximum angles for 3 times. Press the A button. A solid light on the XBOX indicator indicates that the calibration is complete.
GYROSCOPE
When Gyroscope malfunctions, Place the controller on a stable, flat surface. Hold M Button + Share Button and the gyroscope will automatically start the calibration. During the calibration, the RGBstrips will flash red and blue alternately. When the RGB strips returns to their originallighting effect, the calibration is complete.
-
If the controller encounters issues such as being unable to power on or off properly, youcan use a small object similar to the size of a paperclip to press the Reset button insidethe circular hole on the back of the controller. This will force the controller to power off.
-
If the controller encounters issues such as being unable to power on or off properly, you can Hold View Button + Menu Button + M Button till the logo Button blink. This action will reset the profile and all the settings of the controller.
Advanced Tutorials
Extra Button Mapping
Set the extra button value:
Press and hold the M button + L4/R4 button, and the Xboxindicator will start flashing slowly. Press the button you want to map to the extra button,and the XBOX indicator will return to a solid light, indicating that the extra button setting iscomplete.
- Within the setting mode, pressing the corresponding extra button will clear its button value.

Volume Adjustment
Adjust Master Volume
Hold the M button + D-pad Up/Down (11 levels in total)
Note: You'll hear a beep when reaching the maximum or minimum level.
Adjust Game/Voice Balance
Hold the M button + D-pad Left/Right
Left: increase game volume, decrease voice volume. Right: Decrease game volume, increase voice volume.
Note: You'll hear a beep when reaching the maximum, middle, or minimum level.
Mute Function
Press the Mute button to turn on the mic mute function (indicator turns red). Press it again to turn it off (indicator turns off).
Note: When the Mute function is turned on, hold the Mute button to temporarily turn it off. Release the Mute button to turn it back on.
FAQ
The GameSir T7 Pro Sugar Whirl supports XBOX, PC and Android.
250 Hz on XBOX, up to 1000 Hz on PC
The T7 Pro Sugar Whirl is equipped with the latest GameSir Mag-Res™ TMR sticks, combining the precise performance and low power consumption of traditional potentiometer sticks with the exceptional durability of Hall Effect sticks, offering gamers a smoother, instantaneous, and anti-drift gaming experience like never before.
The dual-mode trigger stops allow switching between Hall Effect analog triggers and Micro Switch triggers.
The controller’s shell features a dreamy, delicate swirl of sweet cotton candy and soft morning skies.
It has two remappable macro buttons, including two extra back buttons.
Yes. It features a built-in 6-axis gyroscope for motion control on PC.
Yes. It is compatible with GameSir Nexus software, allowing users to customize button mapping and other settings.
4 in total. One in each grip and each trigger, bring you the most realistic motion experience.
Try performing the Stick & Trigger Calibration via the app or manually.
On the main menu, select the Test icon, then hold Mode button + Menu button to start calibration.
Or follow the manual steps shown in the attached video and written guide:
Enter calibration mode: While the controller is actively connected to your PC or Xbox, hold View button + Xbox button + Menu button until the Xbox button indicator flashes slowly in white.
Calibrate resting point: Do not touch LT, RT, left joystick or right joystick, then press the A button. The indicator will turn off.
Calibrate ranges: Fully press LT and RT to maximum travel three times. Rotate both joysticks to their full maximum angles three times. Press the A button once both operations are finished. The indicator will turn solid white to confirm calibration is complete.
Notes:
- Manual recalibration may succeed when in-app calibration fails.
- Perform calibration at a steady speed with gentle movements to prevent data collection errors.
- Calibration can be carried out via wired or wireless connection.
- Calibration only affects analog trigger mode and does not impact mouse click mode.
Calibration must be performed with the faceplate installed. Calibrating without the faceplate will produce incorrect range values.
The Xbox console enforces a 250 Hz polling rate limit, so the 1000 Hz option is only available on PC.
We do not sell separate spare parts such as controller internal components, replacement buttons, USB ports, standalone receivers, or other internal repair parts. All original bundled accessories included with controllers are not available for individual purchase.
The following items are the only official accessories sold separately:
- Universal data cables
- Magnetic faceplates for G7 series; Magnetic faceplates for Super Nova
- G7 Pro dedicated carrying case
- Detachable joystick caps for G7 Pro and Cyclone 2
- Joystick anti-friction rings
- Universal thumb grip caps
- Chargers for Nova / Nova 2 Lite; Chargers for Cyclone 2; Cooling fan for X5 Lite
- Wireless dongle for Nova (not compatible with Nova 1 / Nova 2 Lite)
- Wireless dongle for Cyclone 2, T4, T4 Pro, T4 Pro SE, G7 Pro, Nova Lite and Nova 2 Lite
You can browse all separately sold official accessories via this link: https://gamesir.com/collections/gamesir-accessories
The M button is positioned underneath the D-pad.
Controllers equipped with a gyroscope are listed below:
-
Xbox Controllers (Gyro function only available on PC): G7 Pro, G7 Pro Wuchang, G7 Pro Zenless Zone Zero, Tarantula Pro Xbox, T7 Pro Sugar Whirl.
-
PC Controllers: SuperNova, Cyclone 2, Tarantula Pro, Tarantula Pro 8K, Nova, G7 Pro 8K.
-
Mobile Controllers: G8+, X5S, X3 Pro, G8+ MFi (Android only)
-
If the controller cannot power on or power off normally, hold the View button + Menu button + M button until the logo LED flashes. This operation resets all profiles and custom settings of the controller.
-
If the controller buttons stop responding, use a thin object such as a paperclip to press the reset button inside the circular hole on the rear of the controller. This will force the controller to shut down.
Configure Generic Controller in Steam
- Launch Steam. Navigate to Steam > Settings > Controller > General Controller Settings.
- Tick Enable Steam Input for Generic Gamepads, then click Begin Setup.
Important tip: When prompted to press the Home/Guide button and Share/Capture button during device input setup, skip these prompts by pressing the A button.
Microsoft imposes certain restrictions, so XInput functionality is unavailable via Bluetooth connection.
For PC gaming, we recommend using the official USB wireless receiver included with the controller. This supports wireless XInput mode while maintaining low latency. If you prefer to stay in Bluetooth Mode, launch your games through Steam to utilize Steam’s built-in controller mapping features.
Ensure the headset is fully inserted and sits flush with the port; push it in firmly. This is a surprisingly common solution for audio issues.
Additionally, you can adjust the settings here: Settings > General > Volume & audio output > Headset audio > Stereo uncompressed. Some users experience headset problems with other options. If you modified the polling rate, switch it back to 250Hz to prevent extra issues.
If your microphone does not work: Confirm the microphone is not muted. Check the Xbox menu and watch for a red LED near the bottom of the controller. Press the dedicated mute button (on supported controllers) or double-tap M button to toggle mute.
If you are using the controller wirelessly and the microphone works via wired connection but fails wirelessly, update the firmware for both the controller and dongle.
If you encounter microphone echo, disable mic monitoring.
Note: Try reducing headset volume. Loud audio may be picked up by the microphone, particularly with open-back headphones. You may also unplug and reinsert the headset.
Adjust volume and audio mix using these D-pad shortcuts: M button + D-pad Up to raise volume; M button + D-pad Down to lower volume. M button + D-pad Left increases game volume and reduces chat volume; M button + D-pad Right does the reverse.
If audio issues remain after completing these steps, the problem may stem from incompatibility with your headset. Test an alternative headset for troubleshooting. Most headsets compatible with official Xbox controllers (CTIA standard) work with GameSir controllers.
Ensure the controller is fully connected. Firmly plug in the controller without holding any buttons to achieve a complete connection — the controller may produce an audible click when properly seated. Once plugged in and your Xbox is powered on, hold the controller’s Xbox button to turn it on.
Notes: Controllers equipped with cable guards may feel fully inserted even when only halfway connected.
Holding one of the following combinations while plugging in the controller enters DFU mode or manual calibration mode: • Xbox button + Menu button • View button + Xbox button + Menu button
An audio tone will play as an indicator; the tone may vary by model.
If the cable is fully inserted, confirm you are using a functional data-capable cable.
After verifying the above steps, perform a full shutdown (also known as a power cycle) of the Xbox. This often restores controller detection, especially if the controller works normally on a PC.
Plug the controller into the rear USB port of the console. With the console powered on, hold the console’s power button for more than 10 seconds until it fully shuts down and the power indicator turns off. Unplug the console’s power cord from the wall outlet for approximately 30 seconds, then press the console power button 10 times to fully discharge residual power. Keep the controller plugged into the rear port, power the console back on, and check if the controller responds.
You may also refer to additional troubleshooting steps here: https://www.wikihow.com/Clear-Cache-on-Xbox-One. Power cycling clears the Xbox cache and can resolve multiple common issues.
To redeem the code, enter it exactly as printed on the paper at https://www.microsoft.com/redeem or https://www.xbox.com/redeem.
Only non-mobile "Designed for Xbox" controllers work on Xbox consoles. If your controller is built for mobile devices or features the GameSir :881 GameSirButton home button logo instead of the Xbox button, official Xbox console support is not guaranteed.
Currently supported Xbox controllers include: T3 Pro Xbox, T7, T7 Pro, T7 Pro Wireless, G7, G7 SE, G7 HE, G7 Pro Tri-Mode, G7 Pro, Kaleid (K1), Kaleid Flux This list may include unreleased products.
On Xbox consoles, you can adjust the indicator brightness level. Navigate to Settings > General > Accessibility > Night Mode > Controller Brightness and adjust the brightness to your preference.
The bundled promotional Game Pass Ultimate code is only valid for new Game Pass Ultimate members. If you have previously subscribed to Game Pass Ultimate, or if you reside in an unsupported region (see https://www.xbox.com/regions), the code cannot be redeemed on your account.
If your account meets the eligibility criteria but you encounter code-related issues listed below:
- "Invalid code" error even with correct entry
- "Code already redeemed" notification
- Code received after its expiry date
- Illegible code caused by poor printing
Please submit supporting evidence (such as photos or a video showing the Game Pass card and the on-screen error message) via email to support@gamesir.com to apply for a replacement code.
Note: We cannot provide replacement codes for other issues such as temporary server faults.
No worries, all GameSir controllers are equipped with overcharging protection, whether used with a charging dock or not. Charging will automatically stop once the controller reaches full battery. Normally, the indicator light turns off upon full charge.
Feature Summary
-
Stick Curves Stick curves define how the controller converts physical stick movement into input signals. Linear curve means input equals output directly (1 input = 1 output). Other curves deliver different response characteristics. Adjust based on personal preference.
-
Deadzone This parameter controls how much stick movement is required to trigger input registration.
- Initial: The distance you need to move the stick away from the center before input is detected. A higher value requires larger stick movement.
- Max: The distance from the outer edge needed to reach full (100%) input. A lower value achieves maximum input with less travel.
- Anti-deadzone Designed to compensate for fixed in-game deadzones in games without native deadzone options.
- Initial: Adjusts the starting input value once the stick passes the initial deadzone. A higher value produces a stronger initial signal. Improper configuration may appear similar to stick drift.
- Max: Sets an upper limit for stick output. With a lower value, the stick cannot reach 100% input even when pushed fully to the edge.
- Hair Trigger
- Static: Any trigger movement within the defined range registers as a full 100% pull. More versatile for general use.
- Adaptive: Trigger registers as 100% once entering the range, yet instantly drops to 0 upon minimal release. Works well for semi-automatic firing, but less ideal for full-auto weapons and aiming down sights.
- Continuous Trigger
- Off: Standard default trigger behavior.
- On: Acts as a toggle. Press once to hold the input; press again to release.
Was this article helpful?
Let us know if you found this helpful or if you need more information.