How to Use the GameSir Tegenaria Lite
For Tegenaria Lite/Tegenaria Lite MenaRD Collaboration Edition, The entry-level beast
Aperçu du produit
Fonctionnalités clés
- • Ultra-low latency wired connection
- • GameSir™ Hall Effect sticks
- • Cushioned and durable membrane triggers and buttons
- • 1000Hz polling rate for instant response
Spécifications techniques
- • Working Platform: Switch, Android, PC, Steam
- • Connection: Built-in 2m USB-A cable for wired connection
- • Weight:230g / 0.51lbs
- • Supported Software: GameSir Connect app
Configuration requise
Windows
Windows 10/11 Wired
Android
Android 8.0 or above Wired
Switch
Switch/Switch 2 Wired
Premiers pas
| Status | description |
|---|---|
| Connect | Plug the cable at the top of the controller into the corresponding device. A solid indicator light indicates a successful connection. |
| Standby | The controller will automatically power off if there is no operation while in connection status for 10 minutes. |
| Wake Up | Press the Home button to wake up the controller. |
| Check Mode | Press and hold the M button to view the current mode of the controller. |
-
By default, the mode will be automatically detected. After manually switching the mode, the automatic detection function will be disabled.
-
Press and hold the Home button for 10 seconds to restore the automatic detection function.
| Platform | Mode | Indicator | Switching Method |
|---|---|---|---|
| PC | XBOX | Green | Hold the Home + X buttons for 2 seconds |
| PC/Android/Other Devices | Other Devices | Blue | Hold the Home + B buttons for 2 seconds |
| Switch | Switch | Red | Hold the Home + Y buttons for 2 seconds |
| Android | Android | Yellow | Hold the Home + A buttons for 2 seconds |
Hold the View, Menu and Home buttons until the controller vibrates once to enter thecalibration. The indicator will flash slowly in white during entry.
Ensure that the triggers and sticks are not being touched. Press the A button once. Then,push both sticks fully to their limits and rotate them 2-3 times. Press each trigger fullydown 3 times. Finally, press the A button to exit the calibration. The indicator will return toits normal state.
This controller has no physical reset button. If needed, try unplugging and reconnecting it.For functional reset (in case of any issues): Press and hold [Menu + Home buttons)simultaneously for 5 seconds.
Tutoriels avancés
Macro Button Setting
Press and hold the M button and L4/R4 button simultaneously until the controller vibrates once. The indicator will flash slowly in white. Press the button you want to assign, then press the L4/R4 button again to exit and save.
- If exiting the setting process without pressing any button, the assigned value for the L4/R4 button will be cleared.

Toggle Stick Dead Zone
Press and hold the M button and press down on the left/right stick to toggle the corresponding stick dead zone.

Turbo Function
While holding the M button, press A/B/X/Y/L1/R1/L2/R2 to activate the Turbo function for that button. Repeat this operation to deactivate. If the button with the Turbo function activated is held down, the indicator will flash red quickly.
- Double-click the M button to clear all Turbo settings.
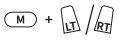
D-pad and Left Stick Swap
Press and hold the M button and the D-pad left button for 3 seconds to swap the functions of the left stick and the D-pad.

Switch Layout
Hold and press M + A buttons to swap the button values of A-B and X-Y.

Adjust Vibration Intensity
While holding the M button, press View / Menu button to decrease/increase the vibration intensity level.

Lighting Adjustment
Brightness Level
Increase/Decrease the brightness level of the lighting. 5 levels: 0% (default)/25%/50%/75%/100% *The setup will still be saved after restart.

Saturation Level
Increase/decrease the saturation level.5 levels in total:0%(default)/25%/50%/75%/100%.
*The setup will still be saved after restart.The saturation is set to 0% (white) by default.Before adjusting the color, please increase thesaturation first.

Color Value
The color value can be adjusted based on theposition where the right stick is held.*The setup will still be saved after restart.

FAQ
The Tegenaria Lite supports Switch, Android, PC, and Steam.
It uses wired connection with a built-in 2m USB-A cable for ultra-low latency.
Yes, the Tegenaria Lite has a 1000Hz polling rate for instant response.
The Tegenaria Lite has 2 rumble motors, one in each grip, providing immersive vibration feedback.
The GameSir™ Hall Effect sticks use non-contact magnetic sensors, preventing wear and stick drift for precise, long-lasting control.
The Tegenaria Lite has 2 mappable back buttons for customizable control.
You can’t physically change the layout. But you can swap the button values of A-B and X-Y by holding M + A for 2 seconds.
Yes, the Turbo function is available on A/B/X/Y/L1/R1/L2/R2 buttons.
Yes, the Tegenaria Lite is supported by the GameSir Connect app, allowing for controller testing and firmware updates.
Cet article vous a-t-il été utile ?
Dites-nous si vous l'avez trouvé utile ou si vous avez besoin de plus d'informations.